06 May Optimising your Rehabilitation of the damned Ankle Sprain
Ankle sprains are one of the most common injuries in athletes. In athletes ankle sprains can account for between 15-17% of all musculoskeletal injuries. Unfortunately, many people just see it as a “simple ankle sprain” and “I’ll just run it off and it will get better”. I’ll guarantee everyone has heard someone say, or said themselves, some variation of those words. Research indicates that up to 70% of people who sustain an acute ankle sprain may develop chronic ankle instability. This is often defined by ongoing laxity at the ankle joint coupled with sensations of looseness or giving way. This is often a cascade where athletes have repeated ankle sprains resulting in an increased risk of further injury. So what’s the best pathway to preventing chronic ankle instability? Do a damn good job of rehabbing your ankle once you’ve sustained your first ankle sprain.
What Is a Sprained Ankle?
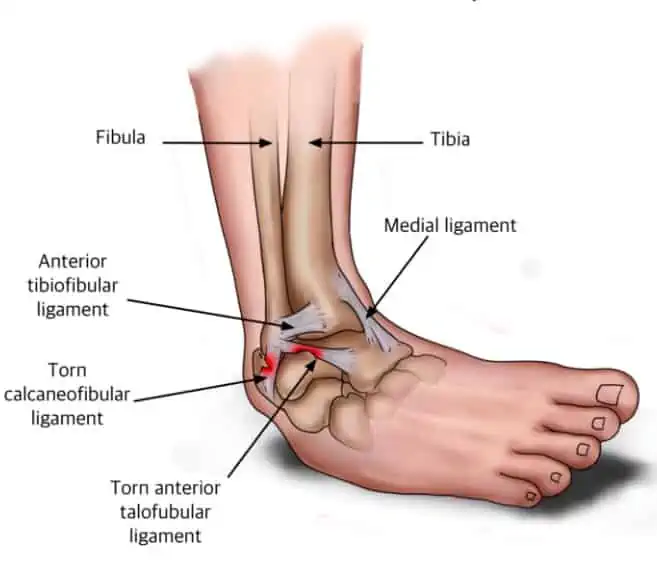
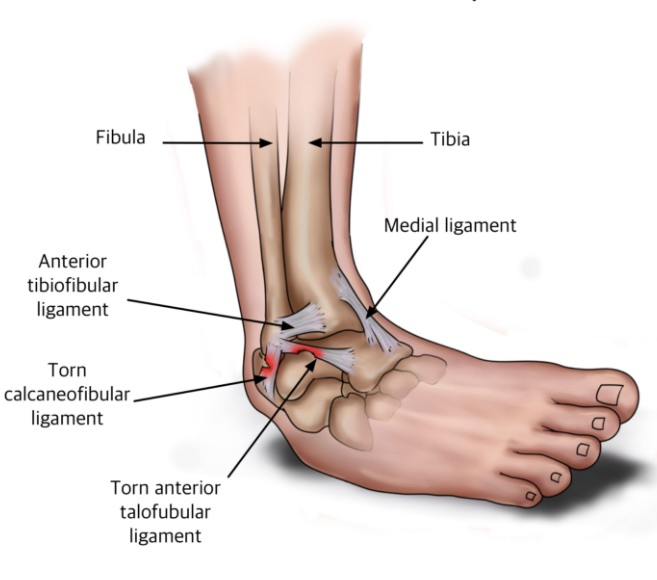
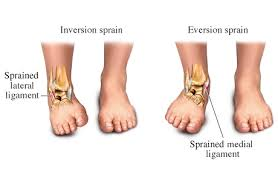
A sprained ankle is a common term used to describe a ligament injury sustained to either the inside (medial) or outside (lateral) ligaments. Most ankle sprains will usually occur on the lateral aspect with approximately 73% of ankle sprains involving the anterior talofibular ligament, these injuries are often referred to as an inversion ankle sprain. The calcaneofibular ligament may be injured at the same time dependant upon the mechanism of injury. The deltoid ligament which supports the medial aspect of the ankle joint is less commonly injured due to the mechanism of injury that is needed to sprain this ligament.
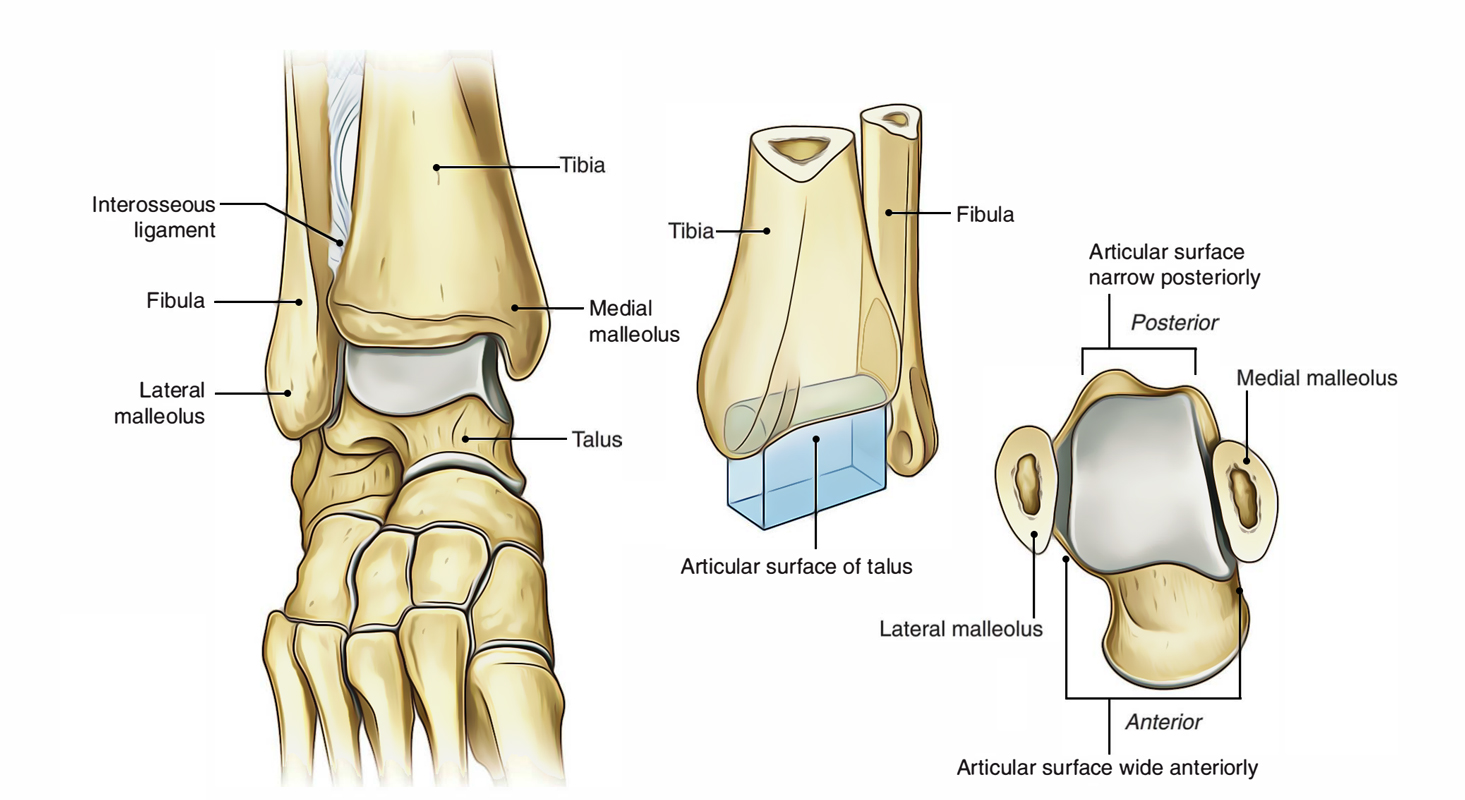
Syndesmosis injuries appear to be becoming more common, these often may be referred to as a high ankle sprain as it is the ligament that supports the two malleoli (the bony bits on the inside and outside of the ankle joint. These injuries may require specialist/surgical input depending upon the severity of the injury as this may leave the joint unstable.
Sprained Ankle Causes
Ankle sprains can be caused by numerous factors including internal or external factors. External factors are often the most common cause, but internal factors are often what lead to ongoing instability and progression towards chronic ankle instability (i.e. the people who don’t do adequate rehabilitation!) Internal risk factors are the most modifiable and are in your control, external risk factors are often outside of your control, hence risk modification is low for these factors.
External factors often include uneven surfaces such as a hole in the pitch or a softer surface, uneven pavement, contact from another player, or landing on another players foot. Intrinsic risk factors are those that are within your control and can often include reduced calf and ankle strength, reduced ankle mobility, or altered proprioception and balance. These are not exhaustive lists and could include many other factors that may increase your risk of a sprained ankle.
Ankle Joint Anatomy
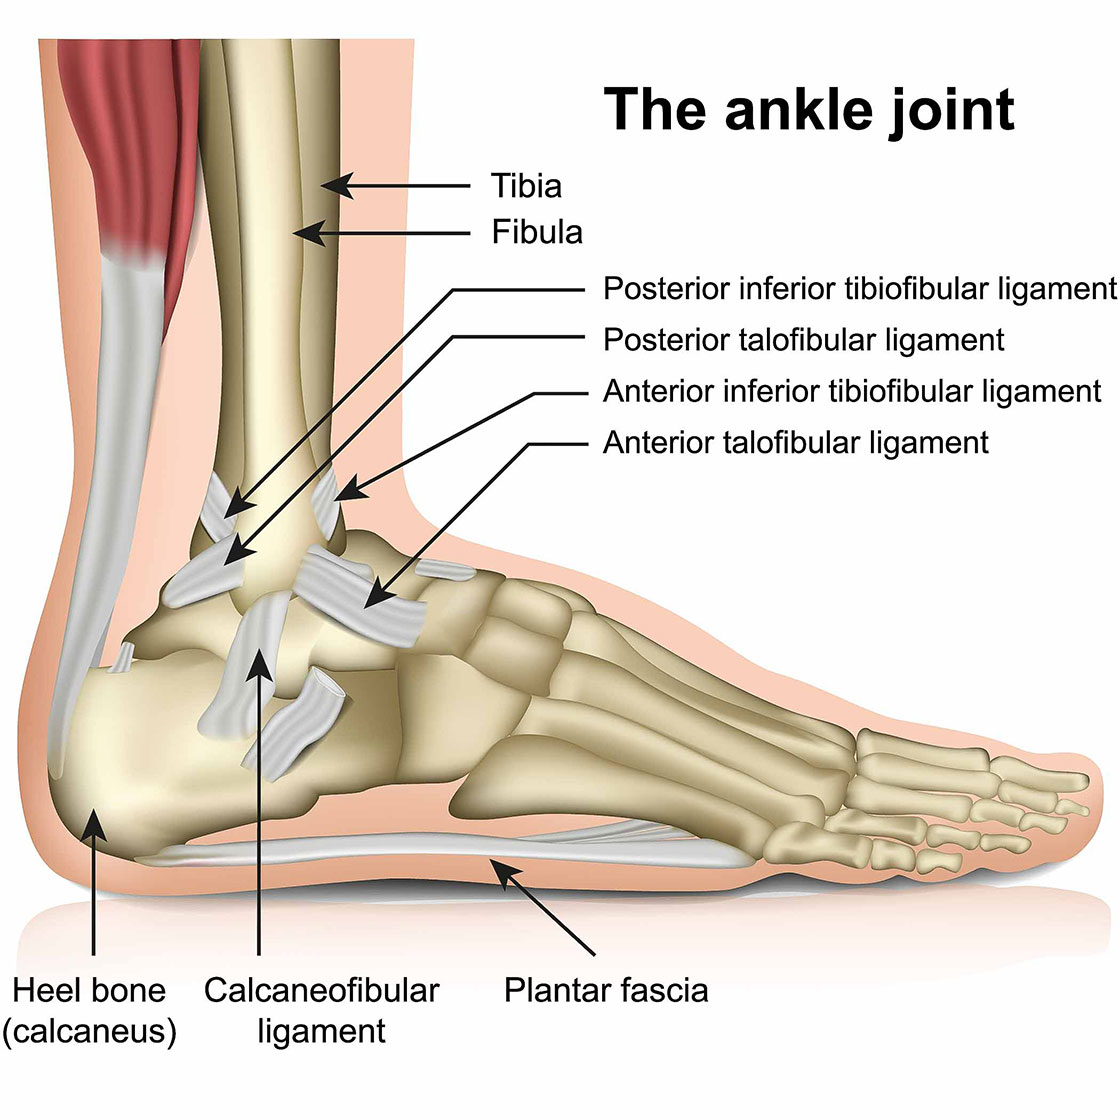
The ankle joint is quite complex from an anatomical perspective involving the articulation of multiple joint and bony structures, multiple ligaments, many tendons and muscles, as well as nervous and vascular system structures. All of these structures could be correlated to symptoms after sustaining an ankle injury. I will try to break down what are ultimately the most important structures relating to a sprained ankle and how they are clinically relevant.
Ligaments
ATFL
The anterior talofibular ligament (ATFL) is the most commonly injured ligament at the ankle. It originates from the lateral malleolus (the bony bit on the outside of the ankle) and inserts onto the talar body. The ligament is responsible for restricting plantarflexion and inversion of the ankle joint.
CFL
The calcaneofibular ligament may be injured at the same time as the ATFL, isolated CFL injuries aren’t necessarily common as they are usually in conjunction with an ATFL injury. The CFL originates from the bottom edge of the lateral malleolus and attaches to the calcaneus (the heel). It’s role is to prevent inversion of the ankle. Most isolated CFL injuries will present as a purely inversion injury. A sprained ankle with an ATFL injury will usually involve an element of plantarflexion.
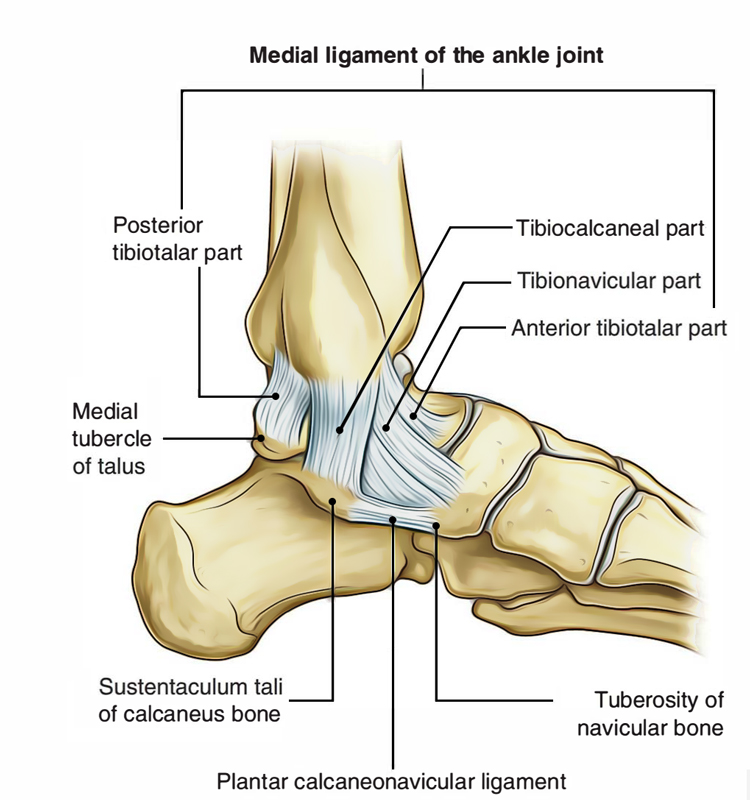
Deltoid Ligament
Technically speaking, the deltoid ligament isn’t a singular ligament, it is a collection of 6 different ligaments composed of a superficial and deep sections. The superficial portion contains 4 ligaments, and the deep portion contains 2. While medial ankle sprains are uncommon they can still occur. This grouping of ligaments, along with the ATFL and the bony mortise of the ankle joint contribute to the stability of the medial ankle.
Distal Tibiofibular Ligament
When an injury to this ligament occurs it is often referred to as a high ankle sprain. A group of ligaments form the syndesmosis which connects your two ankle bones together. Again, these injuries are much less common than inversion ankle sprains but are important for a clinician to rule in or out as imaging may be required. Higher grade injuries to these structures may result in instability and gapping between the two ankle bones which may require surgical input.
Muscles
While I obviously can’t go into every muscle around the ankle joint that can impact upon stability and potential causes for an injury, I’ve picked my top 3 that are relevant both pre-injury from a prevention perspective, and also from a rehabilitation perspective.
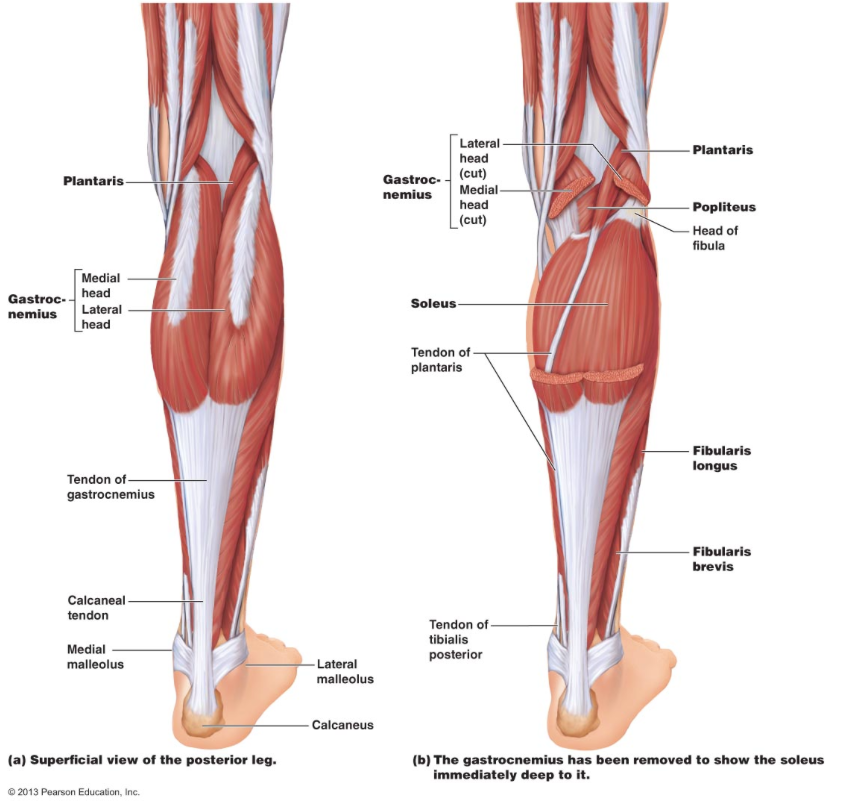
Calf Complex
The calf is made of two separate muscles, the soleus, and gastrocnemius. The gastrocnemius has two separate muscle bellies and it lies on top of the soleus, as such it is commonly the muscle people refer to as their calves. Both muscles are incredibly important for ankle stability and strength. Both muscles are plantarflexors of the ankle but work in slightly different ways. Soleus works at a greater extent when the knee is bent, and the gastrocnemius works more when the knee is straight. What’s the relevance of that though? Because they have two different actions – if I develop I very strong gastrocnemius and neglect my soleus I may lack horizontal power production, hence it’s very important to work on both, unfortunately I find that the soleus is often neglected in rehabilitation and injury prevention programs.
The soleus also plays a vital role in force absorption during running and deceleration. The ability to absorb more force through muscles means that less force will be directed towards the joints.
Both the gastrocnemius and soleus attach to the heel via the Achilles tendon. Tendons and muscles work slightly differently – muscles contract and relax, whereas tendons are more like springs that store and release energy. The more efficient we can make the spring work the more power we can transfer, unfortunately we can’t do this without adequate strength to both calf muscles.
Peroneals/Fibularis Muscle Group
The peroneals run along the outside of the shin and attach to the outside of the foot and are responsible for eversion of the ankle (turning it outwards). These muscles provide support to stabilise the lateral ankle via an eccentric action. Eccentric muscle contractions occur when a muscle is being lengthening while under load. For example if an athlete sustains a slight inversion movement, the peroneals will work eccentrically to slow the movement and potentially reduce the extent of the injury, or, much less likely, prevent the injury from occurring. These tendons can also become a secondary injury occurring with the ankle sprain, either in the form of a muscle strain, a tendon tear, or as a result of the inflammatory cascade that occurs following the ankle sprain. Isolated testing of the muscle group can help to indicate whether there may be any involvement and potentially further imaging may be required. The likelihood of requiring further interventions such as surgery is unlikely in most cases.

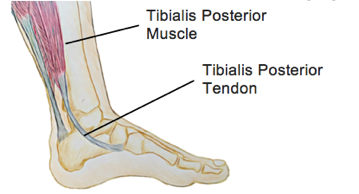
Tibialis Posterior
Picking more of a specific muscle rather than a group here, the tibialis posterior is a very important muscle for foot function. You may be sitting there wondering why I’ve picked a muscle that support the foot as being relevant to ankle sprains. Just stick with me here though. The tibialis posterior works eccentrically during gait, running, and all movements involving the foot to control pronation of the foot (the foot flattening on the floor/ground). If this function is reduced the foot is unable to absorb as much force and as a result the force is transferred higher up the chain with the first spot being the ankle. If we are able to optimise the function of the foot we are able to reduce stress occurring at the ankle. This is vital from both an injury prevention and rehabilitation perspective. Stiffening the foot allows us to provide a more stable base to provide power – this results in both more explosive movements, but also means we have more muscle stability around our foot an ankle – more muscle support at the ankle means we are at a much lower risk of sustaining an ankle injury. Strengthening this muscle should occur both in isolation as well as through retraining movement patterns, calf raises are one of my favourite choices.
Joints
Talocrural
The talocrural joint sits at the front of the ankle and maintaining mobility through this joint is vital for sustaining the capacity for ankle dorsiflexion (the knee going forwards over the toes). The talus rotates within the talocrural joint during dorsiflexion and plantarflexion. Restrictions in ankle dorsiflexion has been found to be a risk factor for injuries such as knee pain, Achilles concerns, calf problems, as well as ankle sprains. It is common for clients to present with stiffness through this joint following an ankle sprain due to both the irritability of the pain as well as the potential swelling that restricts movement.
Lateral Ankle Sprains vs Medial Ankle Sprains
Lateral ankle sprains are much more common than medial ankle sprains. The most common ligament injured is the anterior talofibular ligament (ATFL). These injuries may also involve injury to the calcaneofibular ligament (CFL). Lateral ankle sprains are also referred to as inversion ankle sprains as they require an inversion force to sustain the injury. One of the most common stories associated with inversion ankle sprains is trying to change direction and the ankle giving way underneath you. ATFL injuries often involve plantarflexion and inversion (toes point down and inward) where the athlete may be more on their toes, isolated CFL injuries, while less common, often involve a pure inversion force.
Medial ankle sprains are considerably less common than lateral ankle sprains. These injuries require a forced dorsiflexion and eversion position (toes upwards and pointing outwards). A typical mechanism may be tripping on something and falling over your foot. The ligament that is injured is called the deltoid ligament. This ligament includes a superficial and deep portion along with fibres attaching to different bony points.
What are the symptoms of an ankle sprain?
The early signs and symptoms of a sprained ankle are often swelling, pain, and often but not always having difficulty weight bearing. The swelling onset is due to the soft tissue damage sustained due to the injury. The pain at the time of the injury is often highly localised but then may spread and change as the swelling process begins and other nerve fibres are activated (different nerve fibres produce different pain responses – dull achy sensations are activated by slower nerve fibres, sharp shooting pains are activated by fast nerve fibres). As you progress through physiotherapy other symptoms may appear such as instability or looseness, whilst not overly common, you may not have experienced these symptoms earlier as you may not have placed enough stress upon the ankle joint to create that response. For most sprained ankles, the pain is often going to be localised to the outside of the ankle joint around the malleolus (the bony bit of the ankle) due to the origin and attachment points of the ATFL and CFL.
How is an ankle sprain diagnosed?
Getting an early assessment and diagnosis for a sprained ankle is key to optimising your rehabilitation. A physiotherapist is adequately trained to assess for ligament, muscle, tendon, bony, and nerve involvement in a sprained ankle.
Subjective Assessment
This forms an integral part of a physiotherapists assessment and it’s where we are often able to determine a list of key potential diagnoses. With particular regards to an ankle sprain, the key information we will be asking for will include:
- The mechanism of injury,
- Whether you heard or felt a crack or pop sensation,
- The pain location at the time of the injury and whether that has changed since,
- Whether there has been swelling and how long did it take to begin,
- Were you able to put weight on the ankle,
- Does the ankle feel loose, unstable, or like it might give way,
- Your previous history of foot or ankle injuries,
- Your sporting history including what sport you play, the position, and how your team plays and your role within the team,
- Your goals for rehabilitation including whether there are any upcoming key events or games,
This is not an exhaustive list of discussion points that you will discuss, as we work throughout this information there may be key points of discussion that may come up that we will delve into further.
Objective Assessment
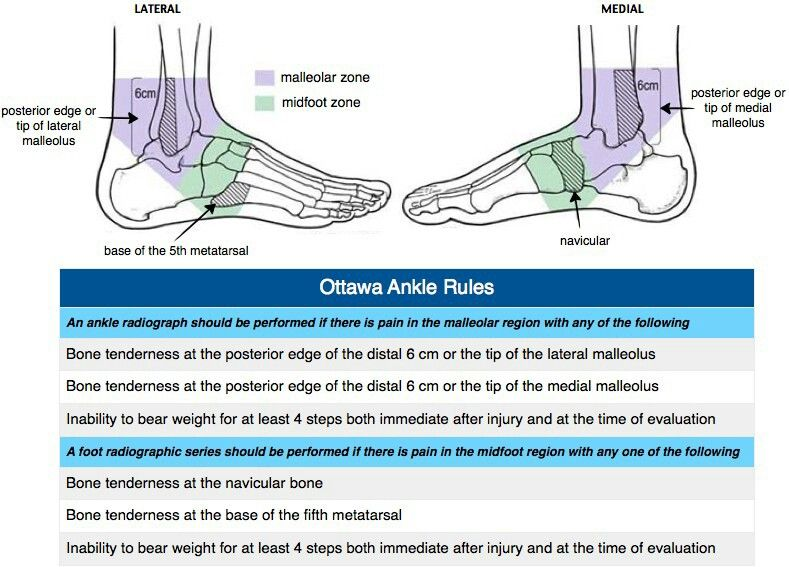
Ottawa Ankle Rules
The first assessment your physiotherapist will commonly perform is the application of the Ottawa ankle rules. These rules are clinical recommendations for practitioners to follow to rule in or out the potential for a fracture. Whilst the application of the rules aren’t highly specific to fractures, they are highly sensitive. This means that if they are negative you can be quite confident you don’t have a fracture, but if they are positive there is a chance there may be a fracture and further investigations such as x-ray is recommended.
Clinical Assessment
Following your subjective assessment your physiotherapist will have a list of diagnoses to rule in and rule out. This is where specific clinical tests to assess particular structures forms an integral part of our skillset.
Ligaments
When assessing an ankle sprain, the most common clinical assessment that will be performed will be an assessment of ligament integrity. These specific tests assess for laxity of the ligament, as well as for pain production upon stress testing. The ligaments are isolated on specific movements and positioning to ensure that we are as specific as possible.
Palpation of the ligament also forms part of this area, assessing for pain production on direct palpation of the ligament can help to specify that the structure in question is irritable. It’s important that we match this with your story as well as other clinical tests as pain on palpation alone isn’t highly indicative of an ankle sprain.
Range of Motion
Assessing for range of motion deficits within the ankle joint early post injury can be key in determining both an appropriate exercise program, as well as targeting hands on treatment options. In the acute stages following a lateral ankle sprain movement may be limited by swelling that has developed after the injury, whereas in the later stages where the swelling has diminished it may be limited by muscle tightness or by joint stiffness. Both avenues require different and specific methods of treatment including targeted management of the injury while away from the treatment table. Ankle dorsiflexion (the ability for the knee to go forwards past the toes) is a very important movement to optimise. It is a key determinant in your ability to return to sport, as well as reducing your risk of future ankle injuries.
Muscular Assessment
Determining whether there may be ankle muscular involvement in the injury should always be assessed. This may be in the sense of a muscle strain, a tendon injury, or tendon irritation due to the swelling process. If a tendon injury is suspected we may recommend you visit your GP to attain an ultrasound referral to assess this further. In most cases these can be resolved non-surgically. Assessment of the muscle and tendon require isolated contractions of the muscles without any movement around the ankle joint. This isolation is needed so that there is as minimal contribution from passive structures such as ligaments, joints, bones, or nerves as possible. Palpation of the tendon and muscle will also be performed, in a similar manner to palpation of the ligaments, matching this to your story as well as other clinical assessments is needed.
Functional Assessment
Determining your current level of function, as well as where your deficits lie is the bread and butter of all physiotherapists. It is the key skillset we hold which separates us from most other professions. The depth of this assessment will often depend upon how irritable your ankle is – there can only be a certain amount of information we can gather if we continue to stir up something that is already quite painful. Often we will want to assess a few key movements:
- Walking,
- Squatting,
- Calf raises (double and single leg),
- Jogging,
- Running,
- Jumping,
- Hopping,
- Hopping forwards and sideways,
- Multidirectional hopping,
- Running and changing direction.
Again this list is far from exhaustive and will often change depending upon your needs and requirements from rehabilitation. Majority of the clients I see won’t be able to have further than the calf raises assessed on their initial consult, but as their rehabilitation progresses and their function improves we will continue to assess higher levels of function and demands upon the ankle.
What we assess for is both pain upon performing the activity, but also looking at the quality of movement, whether there are any range of motion deficits, strength deficits, and whether we can make any technical improvements to optimise the efficiency of your movement.
Balance and Proprioception
This is often an area that can be neglected and forgotten in rehabilitation but is a key risk factor in the development of chronic ankle instability. It’s important to remember that balance and proprioception both relate to static environments (standing on one leg) but also to dynamic environments (landing from a jump on one leg). Too often I hear from clients that they had been given single leg balance on one leg as their balance exercise and just to hold it as long as possible, occasionally someone will have been told to do it with their eyes closed (a great progression as it takes away visual stimulus to make the ankle work harder!). But too often we forget the dynamic component of balance – the capacity to reach outside our centre of balance, to add in cognitive loading (because nobody plays sport thinking about their ankle and it’s balance), or adding in sport specific activities. Balance can be so much more fun than just standing in one spot for as long as possible. Our assessment will often include:
- Single leg balance eyes open and closed,
- Single leg balance while counting down from 100 in 7’s,
- Single leg balance while passing a ball,
- Single leg balance while passing a ball and counting down from 100 in 7’s,
- Single leg balance eyes closed while counting down from 100 in 7’s,
- Hop and land,
- Hop and land while turning in the air.
All of these can both be an assessment and an exercise. Developing balance and proprioception is about variety and exposure, it will never get better at hopping and landing if all you do is practice standing still with your eyes closed.
Grades of Ankle Sprains
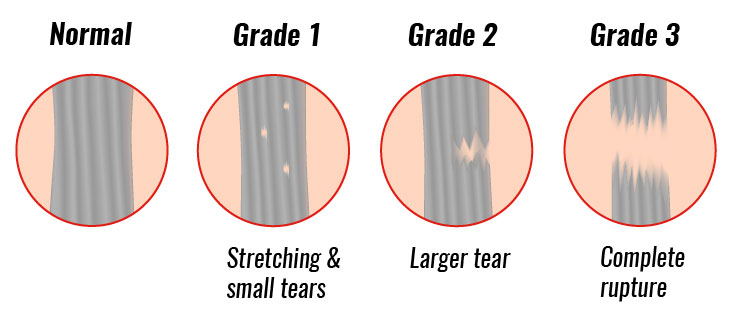
Sprains are commonly graded on a scale of 1 to 3 with a grade 1 sprained ankle being the lower end of the spectrum and grade 3 indicating a higher grade injury. To truly determine the extent of anatomical/structural injury an ultrasound or MRI would be needed, but this may seem excessive in most clinical cases and wouldn’t necessarily provide any great deal of change to the clinical management pathway. Hands on assessment can be just as effective in determining the grade of an sprained ankle. These specific clinical assessments can assess for ligaments laxity, as well as assessing for signs and symptoms. The common assessment findings for different grade sprained ankles includes:
- Grade 1 – slight local tenderness to the ligament and surrounding tissues and no significant joint instability or laxity.
- Grade 2 – swelling and tenderness to the local area, and either no or mild joint instability or laxity.
- Grade 3 – significant swelling and tenderness around the ankle coupled with instability and laxity of the joint.
On ultrasound, a grade 1 injury would show very very minor structural changes to the ligament structure. Whereas a grade 2 is defined as a partial tear, this can include a wide range of structural effects ranging from a small partial tear to a larger partial tear, as such the time to return to sport for a grade 2 sprained ankle can vary significantly. Grade 3 injuries on ultrasound are defined as a ligament rupture where the ligament is no longer connected to itself.
Is it OK to walk on a sprained ankle?
If you are able to weight bear immediately after the injury the risk of having sustained an ankle fracture is reduced. We would recommend an early assessment by either a first aider or a physiotherapist where they can apply the Ottawa Ankle Rules to further determine the potential risk of a fracture. If you pass these tests weight bearing and walking on the ankle is recommended. This helps to maintain muscle activity and reduce joint stiffness build up and will help to reduce your recovery time. It will also have a positive effect on swelling (assuming you don’t go walk around the shops for 6 hours), as walking maintains muscle activity it will help to reduce swelling via the muscle pump action.
How long does a sprained ankle take to heal?
With regards to structural healing time it largely depends upon the grade of the injury. Ligaments are different to muscles in the sense that they have much lower levels of vascularity (blood flow to the structure). This means that the healing process is slightly longer for the same size structural injury in a ligament compared to a muscle. The healing process consists of three phases – the inflammatory, repair, and proliferation phases.
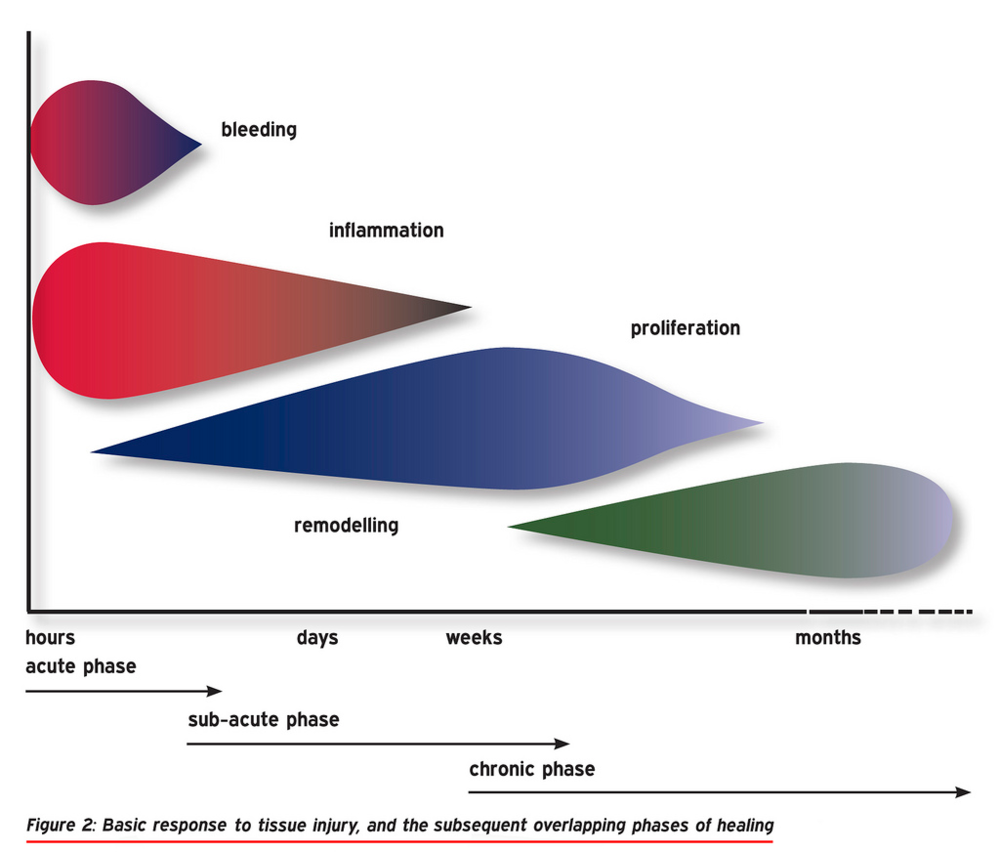
Inflammatory Phase
This is arguably one of the most important phases for recovery (and is one of the reasons we are questioning whether we should still be icing acute injuries). In the early phases there is an acute swelling response from the injury as well as from the body sending blood and nutrients to the area to promote healing. The reasoning why some clinicians don’t recommend the use of ice is that it causes vasoconstriction (less blood flow) to the area – what they suggest is that by restricting this process we limit the bodies capacity to heal. I recommend that clients still utilise ice as it can be both a form of pain management as well as reducing the amount of swelling and the movement restriction that can result from it. As long as we are still allowing the healing process to occur and not icing the ankle 24/7 we may be able to optimise the reduction in swelling and allowing the bodies natural response. The inflammatory phase typically lasts for up to 5 days.
Repair Phase
This phase is where most of the structural repair at the ligament site is going to occur. Because of the blood flow to the area the body then begins to clot over and around the damaged tissue to allow for the transfer of the nutrients to promote healing. As this process continues fibroblast cells proliferate and begin to lay down collagen tissue at the site of the injury. This phase of the process often lasts for around 3 weeks depending upon the extent of the injury. It’s important to remember that these phases aren’t distinctly separate from each other, and often there is a period of overlap between each of the phases.
Proliferation Phase
The final phase of the process is the maturation and reorganisation of the collagen that was laid down in the repair phase. Arguably this is where the collagen is strengthened to it’s optimum state, unfortunately it won’t return to its previous levels of integrity and strength so development of strength of the surrounding muscles is vital. In uninjured ligaments collagen is laid down in a uniform pattern, often in clients that have sustained an injury, under an ultrasound there will be a distinct difference in the appearance of the ligament. Often there will be less of a uniform pattern and a more haphazard appearance.
Recovering from an ankle sprain
In order to optimise your recovery from an ankle sprain there are a few key steps to follow. I may be biases, but my best recommendation is to seek advice from a physiotherapist. We are able to diagnose the injury, assess your function and recommend any changes (such as crutches, moon boot, gait changes) as well as provide you with an exercise program to begin rehabilitation.
My second tip would be to utilise ice, compression, and pain relief as needed. Maintaining normal, or as close to normal, movement patterns can assist by reducing compensations and then needing to relearn normal motor patterns. Often clients become wary of utilising pain relief as they don’t want to damage anything further. Fortunately, the likelihood of causing any further structural damage to the injury is incredibly unlikely.
For a third tip, I would be recommending clients complete rehabilitation and ensure they have developed adequate strength, balance, and power around the ankle. All too often I hear of clients telling me about their “bad ankle”, it shouldn’t be that way. Following an injury and a period of rehabilitation you should be able to perform any and all tasks without hesitation whether that be day to day tasks or returning to sport.
What helps a sprained ankle heal faster?
With regards to structural healing processes, allowing the swelling process to take place is the key component in the early phases. This allows the body to perform it’s natural processes and send nutrients and blood to the area to promote healing. In the later phases when you are in the repair and proliferation phases, maximising your movement mechanics to be as normal as possible will optimise the way that the collagen is laid down and promote greater structural integrity of the healed ligament.
In the functional aspect, maximising your recovery is about getting moving early, seeking hands on treatment to maximise joint mobility and reduce muscle tone surrounding the ankle. This will optimise your movement mechanics and allow you to progress through functional patterns faster as well as progress through your rehabilitation program and develop the strength, balance, and power to return to sport sooner.
Returning to Everyday Activities after an Ankle Sprain
Everyday life activities such as cleaning, gardening, squatting, walking, and stairs can often give clients significant issues early post a sprained ankle. Often this difficulty is going to largely reduce as the swelling and initial pain response settles down. Returning to these types of activities will gradually improve over the first 1 to 2 weeks and you will often be back to normal by the 3rd week without any questioning of doing it. It may be longer activities – for example going grocery shopping or spending a day at the shops or the beach that may still give you some issues where it is testing the endurance of the muscles and capacity of the ankle to be under pressure for an extended period of time. Just remember that strengthening and improving the load tolerance is the way forwards and is the best strategy to improving the endurance of the ankle joint.
Returning to Sporting Activities after an Ankle Sprain
Athletes require a specific approach regarding returning to sport and planning the process. It is integral to have an understanding of the athlete themselves, how they play and approach the game, the demands of their sport, the position they play, and how their team plays. Without this understanding it becomes difficult to truly understand the demands that the athlete is going to place upon their ankle when they play. For netballers, a centre is going to have wildly different demands compared to a goalkeeper, with regards to soccer, a winger and a centre defensive midfield play vastly different roles and playing styles. Some soccer teams may play an up-tempo counterattacking brand of football and others may play with a more defensive strategy, for a winger these two different styles will affect how they play as well as the demands upon the body.
Beginning the return to training process early is one of my key strategies, starting small and building up to help build confidence in the ankle as well as maintain fitness and continuity with their teammates. Of course we want to minimise risks so we would utilise strapping and bracing to secure the ankle. Building through straight line work including jogging, and then progressing to deceleration and acceleration in a straight line are simple progressions. From here we can start to add in some linear change of direction in a simple and predictable environment before we start to implement some “chaos”. The easiest way to do this is to do unexpected things – such as changing directions to a verbal or visual cue.
Progressing through difficulty of drills and training coupled with a targeted strengthening program is the best pathway for an optimised return to sport. One of the key factors, and often one of the most forgotten is the progression of difficulty of drills. Often I hear of clients who have done some jogging and have simply been cleared to return to full training. It is a much more complex scenario than that unfortunately. Full training requires the capacity to – change direction at a moments notice, have the strength surrounding the ankle joint, , have the required range of motion at the ankle joint, have the capacity to maintain strength and technique when changing direction in complex environments involving players on two teams as well as decision making processes. I hope this illustrates the complexities that sport provides and that training and playing may appear simple things but are actually quite complex environments.
Progressing through training often depends upon the level of symptoms during the training session as well as within the 24hrs immediately following. It’s important to monitor for any latent pain, swelling, or stiffness onset that day or the following morning. Should you have an increase in symptoms it may mean that you are loading up too quickly and may need to take a step back before you push too hard too fast. A prerequisite for me for returning athletes to competitive games is that they have to have completed at least 1 full training session and preferably 2 without any untoward symptoms during or after the session. This is able to show me that the athlete is able to tolerate the required loading and also displays their confidence in the ankle to commit to tackles, catches, or situations within the game without hesitation. I believe one of the biggest risk factors for sustaining an injury upon returning to sport is a lack of confidence – often I find this leads to an injury at a different area as players look to take the impact away from their previously sprained ankle.
Ankle Bracing and Taping
These are probably the two most commonly utilised injury prevention techniques used by athletes to reduce risk of another injury. Braces are much easier to apply in that most of them are simply two straps that you wrap around the ankle joint, whereas taping techniques can get a bit technical and require you buy strapping tape (sometimes a lot!). Personally I find strapping much more beneficial for myself, I find that the closer support that is more adaptable by the amount of tension I place on the tape I can get a much better fit. Whereas braces I find somewhat bulky in comparison. Both options are perfectly adequate at reducing your risk of a sprained ankle with taping showing slightly better effectiveness. Most clients who I have who prefer braces tend to prefer it for the simplicity of the application and ease of taking it off. Ultimately for just about all clients I would recommend one or the other for a period of somewhere between 2 and 6 months post returning to sport dependant upon their symptoms when playing sport.
Preventing Ankle Sprains
Prevention is always better than a cure, whether that be preventing your first ankle sprain or preventing recurrent ankle sprains. By implementing an injury prevention program you are able to either reduce the ankle sprain severity or reduce the rate of ankle sprains you may suffer. An all encompassing program involving aspects challenging a number of domains should include:
- Flexibility and mobility
- Strength
- Endurance
- Power production
- Balance and proprioception
- Technique – for example change of direction technique
It is disheartening to hear the number of athletes that I meet that don’t perform any structures injury prevention programming. What could be a 30min program that can be performed twice a week to reduce the risk of numerous injuries is a small price to pay for what could ultimately result in a 3-8 week stint on the sidelines.
Summary
As you can see ankle sprains are far from easily managed injuries, but too often they are underestimated and people don’t put in the work to prevent chronic problems. If managed appropriately, most cases of ankle sprains should be able to return to sport within 1 to 6 weeks dependent upon the grade of injury and the type of sport. An early assessment by a physiotherapist is one of the key strategies to maximising your recovery, we are able to perform a thorough clinical and functional assessment, provide hands on treatment, develop a comprehensive exercise program, and determine a pathway forwards for returning to sport.
Latest Blog Posts
- Lifting Technique “Never Lift with a Bent Back” – Why Those Words Make me Shudder
- When should I see a Physio?
- Adductor Strains – A Footballers Worst Nightmare
- Hamstring Strains – Frustrating, Recurrent, Our process for how we can help you
- Gluteal Tendinopathy – It’s a Real Pain in the Ass
How can we help?